So we start with the bare wall.
I need to mask of the area where my cutouts will be going
And do a rough drawing of how they will look.
I then start by drilling holes around the inside so I have a place to start cutting and filing from.
Time to start cutting and filing down smooth.
Looking pretty good. Doesn't need to be absolutely perfect, because it will be hidden by trim.
Now it's time to prime all of the hall pieces so I can get painting.

But first, if you'll notice again in the photo above from the film, there is also a silver trim around the cutouts. So using some .010mm styrene, I'm going to cut out some trimming for the cutouts.
Then paint them silver.
And apply to the wall. Now that is looking pretty good.
I've decided to also create a box housing to go behind to put the wires in for hoses and tubing. I may also put some very tiny model bits in there as well to look hi tech.
So here's my box created from the .010 mm styrene
Painted black...
And then placed behind the cutout for test fitting. No permanent installation until I do wires and stuff inside.
Now it's on to the seating area. I start out by putting together the bed.
The bed then fits inside the seating console.
Now, if you'll notice in the movie shot below, there's a light just above the seat and below the bed.
The model does come with a piece that is supposed to be painted and look like a light. Most people paint the ends white and the center rod gray.
Come on, if you're following my blog, you know by now that that's not good enough. Everything needs to work where possible. So I've taken 2- 3mm LED bulbs and soldered them together. I've filed down the rounded ends and made them flat. You can see in the movie photo above the ends are flat, not round like the piece above.
I then airbrushed the bulbs white, so they don't look like LED bulbs. And when not on, it'll give a little illusion that they're lights.
Just a tad bigger than the actual piece that comes with the kit. I'll make it work.
Step 2 was figuring out what to do in the area between the bulbs. I thought I'd try to cut a little piece of a stirring straw and wrap it around.
Once wrapped, glued and painted, it doesn't look to bad. Especially when lit.
Next step is the bed area. Putty is needed to fill the seams from the 2 pieces.
Primed...
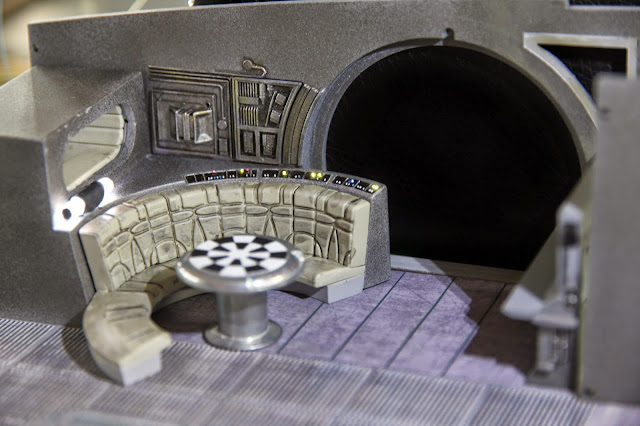
And painted. I don't really like the way the photos are coming out of this paint. To the eye it's very cool looking. It's a metallic gray. Has more of a metallic sheen to it than the speckled look from the photo.
Then painting the seating console. The white and blue are actually buttons. The bigger round ones that are red and yellow are lights. I've painted these for now, but come on, you know. They're getting replaced with fibers.
So now time to drill out some holes so I can do a cutout for the LED's to fit in place.
It barely fits in the cutout I did, but it's enough and looks clean once in.
Then of course, running fiber optics to the seating console.
But you don't get to see it lit yet.
To finish off this area, I need to do the seat.
I've primed and puttied the seat. The model comes with cushions to completely wrap from end to end, but in the movie, the seat back stops at the edge of the bed area and then is just a bench. So I've puttied in the holes for the seat back and will level it out as in the films.
Once sanded, I paint the seat
And now for the big test fit and lighting. Looking pretty good I must say.
STAY TUNED. MORE TO FOLLOW SOON WITH THE NAVIGATION CONSOLE.


Hello, you have an amazing bog. My I ask wich colours did you use to paint the walls and how do you did it?
ReplyDeleteThanks
I used Tamiya Metallic Gray (XF56) for the walls. The walls were primed first with Tamiya light gray primer, then lightly airbrushed with the metallic gray.
DeleteThank you. That colours looks amazing. I will search for it. I asume that you use the same colour range in most of the interior pieces. Isn't it?
DeleteYes. Used it for the walls, floor, corridor flooring, beams, etc. Pretty much anything that should be metal.
ReplyDeleteI know it’s been awhile, but seems my LEDs for the bunk bed lights on light up on one end. I soldered both negative leads together with the black wire and positive leads to the resistors and red wire. Appreciate if you could point right direction cos I can’t save me life with my electrical knowledge!
ReplyDeleteNot really sure what the issue could be. Sometimes a cold solder joint could cause an issue like that. Sometime just reheating the solder points can help. I suppose there could also be the rare situation of a bad LED. I think very rare, but it could happen. Other than those 2 things, I don't really know what else it could be.
DeleteThis comment has been removed by the author.
ReplyDelete