May 31, 2017

Pt 31 Cockpit Painting and Assembly

So the first thing up for the cockpit is a little modification I made to the console.  The little monitor which I have lit up to the left of the control sticks actually has a little housing around it, as seen in this screen cap from the movie.


So I built this little housing out of a styrene sheet.  I cut some strips 2mm wide and 4mm long and glued them together, then primed and painted it black.


And then carefully glued it in place over my monitor.


I also purchased a 3D printed cockpit cabin door.  The kit came with a sticker which you place on the back wall to simulate the door.  Here is a before shot....


The other problem with this is that the door is inset about 3/4" back. In reality, the door is almost right up against the frame.   So I got this 3D printed door from Shapeways.....


 Primed it....


Painted and detailed it...


Added some red fiber optic to the lock mechanism console...


And here we have it installed in the cockpit.  Looks sooooo much nicer than the sticker, which was also difficult to see because of being set back so far.  You can see the red light in these 2 photos I took below.  One with the back wall lit and one with just the red lock lights.


So on to finishing up the cockpit.   So I assembled the 3 pieces of the cockpit nosecone together.  This consisted of an upper and lower half,  and then the nose itself. 


There was a decent visible seam between the upper and lower half, which you can see here.


So I puttied and sanded it smooth and shot it with primer and voula.  A nice clean panel.


Once painted with the body color, I then taped off the areas to be painted gray.


Airbrushed those in and then did blast marks and panel markings with the gray.  I also did a light dusting of a red brown to add just a hint of color so it's not all just gray.


With the nosecone now done, it's time to move on to the cockpit tube.  One of the first things I wanted to do before any painting was add the 2 red lights found on the outside of the cockpit, which you can see in this screen cap.


So I marked the 2 holes that needed to be drilled out and did so.


I then soldered a couple of red LEDs together spaced apart the exact distance needed to fit in the 2 holes.


And a test of the LEDs.


So the next thing was to paint the inside of the cockpit tube.  I did this with black spray paint so that no light would leak through the plastice model from all of the LEDs and fibers used in the cockpit.


I also had to grind down some of the model to make room for the LEDs, so that the back wall of the cockpit would fit in place.


And I also had to notch the back wall itself to allow the leads of the LEDs to come through.


So at this point I glued the LED's into place...


Then glued the 2 halves of the cockpit tube together.  But there is a seam in the model that needs to be dealt with.  So I puttied the seam up here.....


Then sanded nice and smooth.


So then it was time to preshade the panel lines black...


Apply the body color and then tape off the gray areas to be airbrushed...


So I purchased a photo etch piece of ribbed work to apply around the cockpit ring.  The model just has the ribbed ring molded into the plastic, but I wanted more depth, and also to conceal the holes for the lights a little better.


So this is the photo etch piece...


Which will wrap around the cockpit tube...


 So I primed and painted the etch strip...


And then glued in place...


So it's now time to finish weathering and painting the cockpit tube.


Then glue the cockpit nosecone to the tube...


Some black washing on the bottom side for detailing....


And some of the dirty yellowing seen on the real filming miniature...


And... we then have a completed cockpit.


So I'm just about done.  All that's left is attaching the cockpit to the upper hull, painting the upper hull, than attaching to the bottom.


So stay tuned.  MORE TO COME....


May 6, 2017

Pt 30 Final Modifications

This is probably my biggest blog update to date.  There's a lot to cover in my final mods.
So I'm just about ready to attach everything to the inside of the bottom hull.  But there are some modifications I still want to do before I can attach the insides and place the top on.


My first modification is to fill in the holes on the bottom of the Falcon where the mount that comes with the kit would attach.  You can see the 4 holes near each of the landing gear doors.


So I filled in each hole with putty and then sanded down smooth.


The 2 rear holes needed a little more work, as they had a bit of a stair step to deal with.  So I used a dremel to grind down and then did more sanding.


 Once I was happy with the holes, I then had to re-carve panel lines into the hull.  So I started by drawing them out...


 Then cutting them in.


Then a little primer...


Some paint...


 weathering...


And a clean bottom hull with no more holes.


My next modification is the engine grill.  This is the engine grill that comes with the kit.


It doesn't look bad.  It's a piece of white plex with a green/blue painted grill design on it.


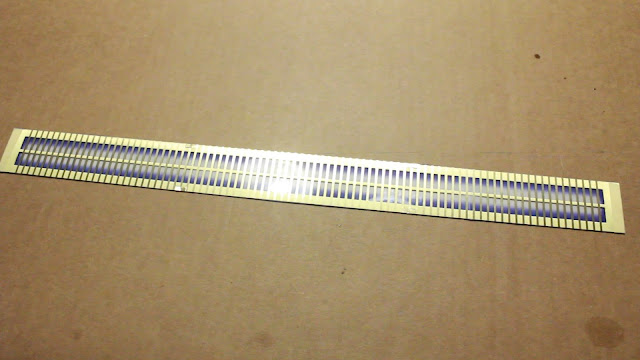
I want it to look more like the actual movie.  A real metal engine with energy coming from it.  So I got this photo etch grill from online.


The 3 metal photo etch pieces were cut out and glued together to form a long piece.


Which was then placed over the white gel with the blue halo outline...


 cut and trimmed...


Primed and painted.


And the gel was glued to the back side of the photo etch and put in place in the back of the Falcon.


Looks  SOOOOOO much better than the kit version.  Looks like a real metal grill with just and engine illuminating from behind.


And compared to the film.


Next is I finally figured out how I'm going to light the gunner port once placed in to position. While I knew I wanted to use an LED strip, I wasn't quite sure how I would secure it to light up the gunner port.  So I took a plastic water cup and cut out a strip.


And then secured the LED strip to the inside curve of the cup.


I then glued one end to the back of the hold and the other end to the corridor.


When the gunner port is secured to the top hull and the top is put in place, the gunner port lowers into the middle of my LED strip and lights up.


Now because I'm only doing the upper gunner port, because my mount for the Falcon will use the lower port area, I printed out a photo of a screen capture from Star Wars to place at the bottom of the tube connecting the 2 ports.  So hopefully, if you can see through, it'll look as though the other port is there.


My next addition to the cargo hold are some barrels and crates to add to the forward wall area.  I bought these 3D printed ones from Shapeways online.


 Primed them...


 painted them their base coat...


 scratched up the black metal crates...


weathered the barrels and can with black wash and rust colored pastels...


 giving me these final items.


 Then glued in place where I liked.  A couple, being high on the beam shelves as well.


My next modification is the little corridor on the starboard side of the interior hold.  As you can see in this photo below, it's very short and has an open end.  You can see through it.  Once inside the model, it'd just be a black hole.  In reality, it was a corridor leading to anther area of the ship.  I could spend a bunch of money and repurchase more corridor, but I came up with a rather cheap solution.   While not perfect, works quite well.


 I broke this piece of mirror out of a small compac...


 glued to the back of the corridor...


And voila.  An extended corridor.   Again, not perfect, because there is a little bit of a gap, but nicer than just an open black hole.


And now to finish off the interior hold.  I've been wanting to light the forward and aft walls of the hold.  So for the forward wall, I drilled 4 1mm holes in through the back...


Inserted the smallest SMD LED lights made.  They're about a 1/4 the size of a grain of rice or smaller.


held them in place with regular old Elmer's glue.  Didn't want to use anything harsh.


Now, for the aft wall, I made some styrene extensions for the beams and glued them to the kit ones...


 I then made a little light box from Styene.  The front wall painted the same metallic gray as the hold walls, and the bottom is just the styrene white to diffuse the light...


 Which was then inserted behind my beam extensions.


I then glued an LED strip to a thicker strip of styrene that I cut to keep is stiff.


Glued some little I-beam styrene pieces to the LED strip as little supports....


 And lowered it in to my light box I made.


Then capped off the top with another piece of styrene painted the metallic gray.


And here we finally TRULY have my completed interior cargo hold, ready to be placed inside the lower hull of the Falcon.


So there it is, completed and all lit up.  I'm seeing the finish line finally.  All that's left is to secure the hold to the bottom hull, paint the upper hull and attached the sides.  Very close to the end.


So stay tuned.  MORE TO COME....