Wow, all your posts are amazing. I'm doing my own millennium falcon model following your blog.
I will like to ask you something. Currently, I'm working with the hall area and I see that you are using a lot of brass etch kits. All of them seems to be from the same customer. Can I ask where can i buy them?
Oh... what a pity. I just saw the brass pieces for the navigation console and it's awesome. But I just finish the lighting and modifications in my own console...
Chris - I'm blown away with your results and just recently subscribed myself. I'm a pretty accomplished modeler, but know nothing about LED and fiber optic lighting. Can you do a post, or would you be willing to help me via email concerning the lighting you've done. I've ordered some parts, but the additional boards and powering the separate components baffles me. Look forward to your response, Chris in NC
I'm not a electronics genius by any means. I know basics about + & - and voltage. What I've posted already is about all I know. There may be a little bit more info on my youtube videos, but I'm pretty limited. It was just trial and error. Doing the boards was something I've never done before and was all done on the fly. I don't know how to do schematics or anything. I just winged it. I could possibly try to answer questions you may have, but I'm not really knowledgeable enough to go in depth about what I did.
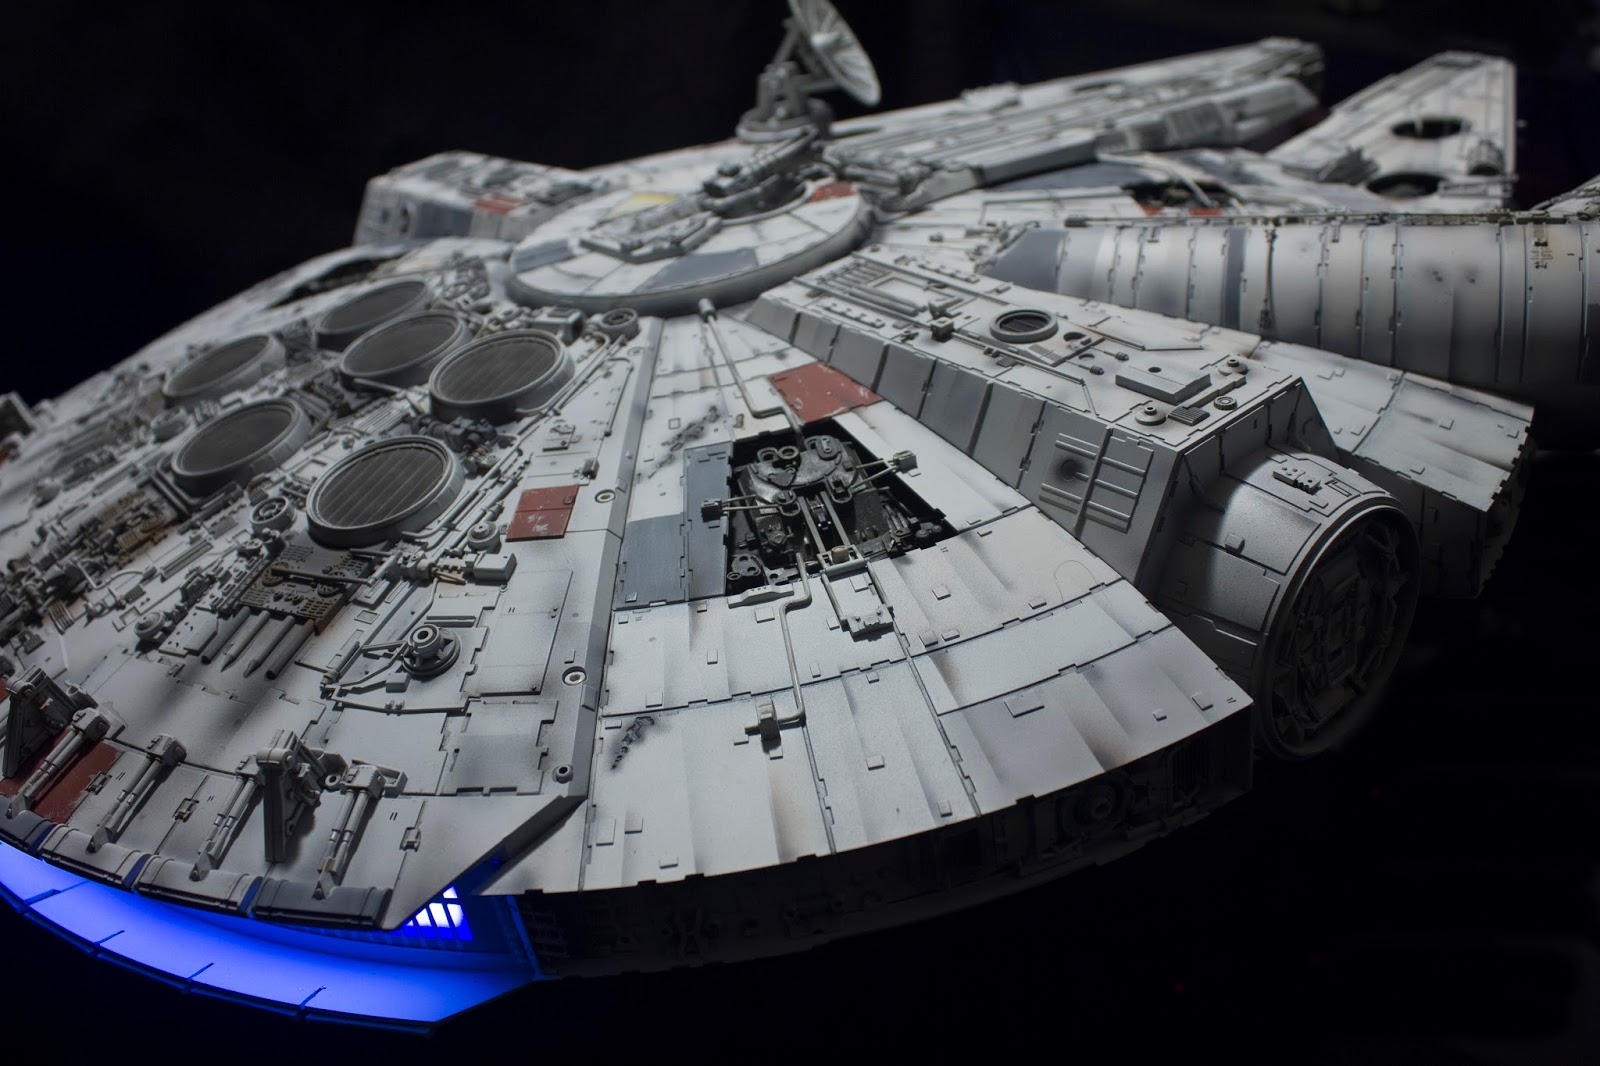
I would like to know what the blue box next to the hold area is for. I need 12 volts to power my 3 Ezy LED's which you used to fill the blank space between the 2 supplied sublight exhaust(?) strips. Is the blue box a step-up transformer to lift the voltage to say 12volts to light these 3 LEDs? (which have a higher switch-on voltage than any of the other LEDs....including the corridor floor lighting.
That is actually a power unit that came with my EL Wire, that I used to light up around the pits in the hold floor. It may be a step up to 12v, but it's how that powers. I didn't have an option there. You can see the EL wire install in my Pt. 14, though I never really showed the power supply. But that's what it's for. Other than that, my entire model runs off of my 9v supply.
Thanks for the info, Chris. Guess I'll just have to use a separate 12v plug pack just to power the 3 LEDs in the centre of the exhaust array. It can be tough when you want everything just right! Thanks for sharing your build with us. What a fine result. Cheers. Peter
I just wanted to say that your model is absolutely fantastic! The lighting is superb and sets off the mood of the Falcon brilliantly. I have only just started my model and got to grips with weathering! But I want to get into lighting. I have bought the fibre optic cables but I have no clue as to how to work the electrics. Can you point me in the right direction in where to learn the basics? Or can you help me? Thanks Charl
As far as electronics, I just watched youtube videos and did a lot of online research to learn. I knew I was powering my Falcon with a 9v supply, so I based everything on 9v. The LED's I purchased (mostly on ebay) were all pre-soldered with resistors for 9v power. That made it a lot simpler.
Thanks Chris, I will take that all on board. At the moment most of what you have said does not mean very much to me except the 9v suppy! I really do need to start at the very very beginning! But you have given me the bare bones. Thanks! Charl
Hey Chris, First of all, I want to thank you for sharing your journey and giving us the inspiration and knowledge to jump down that rabbit hole ourselves. Truly amazing! What camera/settings did you use to photograph the model? Especially the interior areas. Thanks! Christopher Reeves


Absolutely AMAZING job. Been following your work since day one. Congratulations!
ReplyDeleteThank you
DeleteSuperior results! (removes hat & bows deeply) Well done!
ReplyDeleteThank you
DeleteSpectacular job Chris, where did you get the schematic from?
ReplyDeleteSorry. Schematics for? My wiring? The Falcon?
DeleteGreat job Chris.
DeleteI believe he is talking about the schematics on the second image.
If you're talking about the metal blueprint seen in the second image as icaro da Cunha mentioned, that was from Hobby Lobby.
DeleteBeautiful model, amazing job. i'll start my own, with your result in sight.
ReplyDeleteGreetings from France
Wow, all your posts are amazing. I'm doing my own millennium falcon model following your blog.
ReplyDeleteI will like to ask you something. Currently, I'm working with the hall area and I see that you are using a lot of brass etch kits. All of them seems to be from the same customer. Can I ask where can i buy them?
Thanks in advance.
They're all from Paragrafix.biz. Paul does an amazing job on the photo etch.
DeleteThank you very much
DeleteOh... what a pity. I just saw the brass pieces for the navigation console and it's awesome. But I just finish the lighting and modifications in my own console...
DeleteSame reason I didn't use his photo etch for my cockpit. I had actually finished mine before Paul had even made them available.
DeleteThis comment has been removed by the author.
ReplyDeleteChris - I'm blown away with your results and just recently subscribed myself. I'm a pretty accomplished modeler, but know nothing about LED and fiber optic lighting. Can you do a post, or would you be willing to help me via email concerning the lighting you've done. I've ordered some parts, but the additional boards and powering the separate components baffles me.
ReplyDeleteLook forward to your response,
Chris in NC
I'm not a electronics genius by any means. I know basics about + & - and voltage. What I've posted already is about all I know.
DeleteThere may be a little bit more info on my youtube videos, but I'm pretty limited. It was just trial and error. Doing the boards was something I've never done before and was all done on the fly. I don't know how to do schematics or anything. I just winged it. I could possibly try to answer questions you may have, but I'm not really knowledgeable enough to go in depth about what I did.
I would like to know what the blue box next to the hold area is for. I need 12 volts to power my 3 Ezy LED's which you used to fill the blank space between the 2 supplied sublight exhaust(?) strips. Is the blue box a step-up transformer to lift the voltage to say 12volts to light these 3 LEDs? (which have a higher switch-on voltage than any of the other LEDs....including the corridor floor lighting.
DeleteThat is actually a power unit that came with my EL Wire, that I used to light up around the pits in the hold floor. It may be a step up to 12v, but it's how that powers. I didn't have an option there. You can see the EL wire install in my Pt. 14, though I never really showed the power supply. But that's what it's for. Other than that, my entire model runs off of my 9v supply.
DeleteThanks for the info, Chris. Guess I'll just have to use a separate 12v plug pack just to power the 3 LEDs in the centre of the exhaust array. It can be tough when you want everything just right! Thanks for sharing your build with us. What a fine result. Cheers. Peter
ReplyDeleteThe LED strip I placed between my 2 kit engine strips powers off of 9v, so I just added it to my board. I got my strip from paragrafix.
DeleteVery good, nice pictures!
ReplyDeleteLego Star Wars
Thank you
DeleteYour a collector of authentic Vader helmets, yes ?
ReplyDeleteNice post. It is really interesting. Thanks for sharing the post!
ReplyDeletefridge online shopping
refrigerator online shopping
refrigerator price online
online fridge price
Washing Machine Sale
washing machine online offers
Sathya Online Shopping
Hi Chris,
ReplyDeleteI just wanted to say that your model is absolutely fantastic! The lighting is superb and sets off the mood of the Falcon brilliantly. I have only just started my model and got to grips with weathering! But I want to get into lighting. I have bought the fibre optic cables but I have no clue as to how to work the electrics. Can you point me in the right direction in where to learn the basics? Or can you help me? Thanks Charl
As far as electronics, I just watched youtube videos and did a lot of online research to learn. I knew I was powering my Falcon with a 9v supply, so I based everything on 9v. The LED's I purchased (mostly on ebay) were all pre-soldered with resistors for 9v power. That made it a lot simpler.
ReplyDeleteThanks Chris, I will take that all on board. At the moment most of what you have said does not mean very much to me except the 9v suppy! I really do need to start at the very very beginning! But you have given me the bare bones. Thanks! Charl
ReplyDeleteHey Chris,
ReplyDeleteFirst of all, I want to thank you for sharing your journey and giving us the inspiration and knowledge to jump down that rabbit hole ourselves. Truly amazing! What camera/settings did you use to photograph the model? Especially the interior areas. Thanks! Christopher Reeves
This comment has been removed by a blog administrator.
ReplyDeleteThis comment has been removed by a blog administrator.
ReplyDelete